Bars & Squares

Nanaimo Bar Bites

December 16, 2013

nanaimo bar bites // bakeaholic.ca

nanaimo bar bites // bakeaholic.ca

Nanaimo bars were one of my favourite treats that my grandmother would make. Whenever we had a family get together, a baby shower, wedding shower etc. we would have Nanaimo bars. They are a treat that you don’t usually make unless it is for a special occasion, however, they are really quite simple to assemble and require no baking which would make them a great dessert for anytime. 

While I was going to make them the traditional way – a three layer decadent and sweet square, I had an idea. 

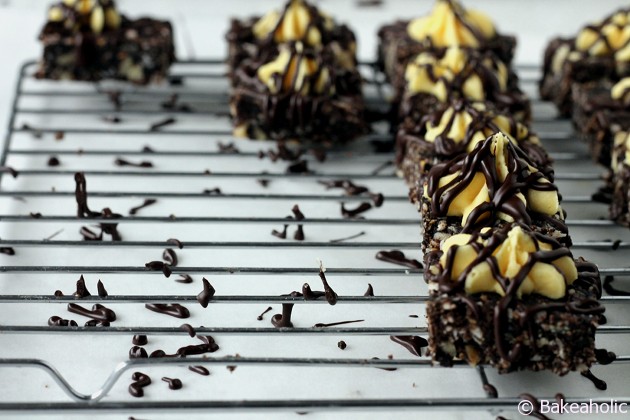
While preparing the custard layer I thought I might use a piping bag to pipe the filling on first, then spread it evenly on top with an offset spatula. Then it hit me – why not just use the piping bag to pipe the filling into rosettes and then cut them into squares before adding the chocolate?

Bingo. 

Nanaimo Bar Bites // Bakeaholic.ca

One of the hardest things I find when making Nanaimo bars is cutting them once the chocolate has hardened. It’s difficult to make them into perfect squares because the chocolate cracks and breaks when you cut into it, especially once it is cold. However my aunt who is the queen of Nanaimo bars (and learned from my Grandma) always made them perfectly.

I thought it would be much easier to cut them before adding the chocolate, then drizzle it on top as a decoration. I also find that because the filling is so sickeningly sweet sometimes that the extra slice of chocolate on top almost sends you into a sugar coma. This way you still get the combination of chocolate and custard filling, only on a much smaller scale.

And truthfully – my favourite part was always the base. I love the combination of coconut, chocolate, graham crumbs and walnuts. I could just eat the base without the sweet toppings. 

These bars as extra special because they hail from a small town on Vancouver Island, Nanaimo, which the dessert was named for (although there have been other claims). However at the end of the day a Nanaimo bar, is a Nanaimo bar. 

This is the recipe my grandmother and aunt use and it is my favourite. Of course, you can still make it the traditional way by spreading the filling then pouring the chocolate over top and slicing it into squares. In my opinion, they look much prettier this way. 

Nanaimo Bar Bites // Bakeaholic.caNanaimo Bar Bites // Bakeaholic.caNanaimo Bar Bites // Bakeaholic.ca

Nanaimo Bar Bites // Bakeaholic.ca Nanaimo Bar Bites // Bakeaholic.ca

Nanaimo Bar Bites
Yields 50
A modern take on a traditional classic - Nanaimo Bar Bites are a decadent twist on the beloved three layer square with a chocolate cookie crumb base, custard filling and chocolate drizzled top.
Write a review
Print
Prep Time
25 hr
Total Time
1 hr 25 min
Prep Time
25 hr
Total Time
1 hr 25 min
Bottom Layer
  1. 1cup Unsalted Butter
  2. 1/2 up Sugar
  3. 10 tbsp. Cocoa
  4. 1 Egg beaten
  5. 1 ¼ cups Graham Cracker Crumbs
  6. 1 1/4 cups Chocolate Cookie Crumbs
  7. 3/4 cup Walnuts, chopped
  8. 2 cup coconut
Second Layer
  1. ½ cup Unsalted Butter
  2. 2 Tbsp Almond Milk
  3. 2 Tbsp. Birds Custard Powder
  4. 2 cups icing sugar
Third Layer
  1. 4 squares Dark Chocolate
  2. 1/2 Tbs. Butter
Instructions
  1. In the top of a double boiler (if you do not own one, place a glass or metal bowl over top of a sauce pan filled with simmering water) melt together the butter, sugar and cocoa.
  2. In a small bowl beat the egg. Slowly whisk it into the melted butter and cocoa mixture. Continue to whisk until it thickens.
  3. Remove from heat and stir in the crumbs, coconut and chopped walnuts.
  4. Press mixture into an ungreased 9"x13" pan and place in fridge.
  5. In a stand mixer with paddle attachment whip the butter until pale and creamy. Add the almond milk and custard powder and continue to beat. Slowly add the icing sugar and whip until the consistency of frosting.
  6. Transfer to a piping bag fitted with a star tip.
  7. Take the chilled base out of the fridge. Using a sharp knife, score the top of the base in 1" sections, drawing lines horizontally first then vertically.
  8. Using the piping bag, pipe rosettes on to the middle of each 1" scored square section. Repeat until entire surface is covered. Place in fridge, covered.
  9. Allow to set in fridge for about 45 minutes to an hour. You want the base to set and harden completely. Once it is hardened, remove it and use a dough scraper or sharp knife to cut the bars all the way through, then lift them out carefully with a fork.
  10. Finally, after you have sliced the bars fully into squares place them onto a cooling rack with a piece of parchment paper underneath. Melt the Chocolate and butter in the microwave in 1 minutes intervals, stirring until fully melted. Spoon the melted chocolate into a ziplock bag or piping bag and snip off the corner. Drizzle the melted chocolate over top of the bars. Place aside to allow chocolate to set.
  11. To store the bars, place them in an airtight container in the fridge separating the layers with parchment. Alternatively, you can place them back into the 9x13" pan and cover.
  12. The bars also freeze very well.
  13. ** To make traditional bars double the ingredients for the Custard and stop at Step 5, then spread the Custard layer evenly over the base and cool. Melt the chocolate (You will need slightly more chocolate to cover the top) and spread evenly over top, allow to set in the fridge. Cut into bars/squares **
b a k e a h o l i c https://www.bakeaholic.ca/


Christmas, Cookies, Holidays

Almond Butter Buttons

December 15, 2013

Almond Butter Button // bakeaholic.ca

Almond Butter Button // bakeaholic.caIt didn’t really feel like ‘Christmas time’ until today. We received our first Christmas card in the mail the other day and we’re going to our first Christmas party tonight! We’re also co-hosting a christmas party at our place Monday night for our neighbours. 

We even have some more lights on our tree after every hardware store seemed to sell out of lights before December 6th this year. Luckily Adam was able to find some more yesterday so our rather large tree could really be lit up. So now all our decorations are up now and we’re ready to go. 

I spent about 6 hours in the kitchen yesterday baking, as well as a few nights last week. I wanted to get it all done and put away so I could just pull out the treats when I needed to. Also, I tend to make a rather large mess when baking so my philosophy is do it all now, make one big mess and then it’s done. Makes sense – right?

These are one of my favourite cookies to make. Since I have a slight peanut allergy, along with many other people, I switched these traditional peanut butter blossoms to almond butter and swapped the hershey’s kisses out for extra large dark chocolate chips. I still made a few with the Hershey’s milk chocolate kisses, although they were so melted that they lost their shape. They still taste delicious, and that’s what really matters. 

This recipes makes a large batch because I like to make the cookies smaller than usual. I find that when I’m at a party I like to taste everything – and having a full size cookie or treat limits how many you can try. Plus when they are really decadent or sweet a big piece can send you over the edge. WIth the large dark chocolate chips the cookie itself can be smaller, and the chips are the perfect size. 

I always make smaller versions of desserts or cookies for when I’m making a platter or bringing them somewhere so that people can have a little bit of everything. Or you can go ahead and eat 4 or 5, it’s the holidays!

I’ll be posting a new holiday recipe each day until Christmas. These are one of my favourites – really anything with nut butter and chocolate. What about you??

Almond Butter Button // bakeaholic.ca

Almond Butter Buttons
Yields 36
Soft almond butter cookies studded with dark chocolate chips - like the peanut butter blossoms, but peanut-free.
Write a review
Print
Cook Time
10 min
Cook Time
10 min
Ingredients
  1. 1 cup butter
  2. 1 cup almond butter
  3. 1 cup packed brown sugar
  4. 1/2 cup white sugar
  5. 2 eggs
  6. Splash of Almond milk
  7. 2 teaspoons vanilla extract
  8. 3 1/2 cups all-purpose flour (Gluten-Free All purpose, regular All-purpose or Whole Wheat will do)
  9. 2 teaspoons baking soda
  10. Jumbo Dark Chocolate Chips/Hershey's Kissess
Instructions
  1. 1. Preheat oven to 375 degrees F
  2. 2. In stand mixer cream together butter, almond butter, brown sugar, and sugar until smooth. Add in the eggs one at a time, beating until fully incorporated. Mix in a couple splashes of Almond milk and 2 tsp vanilla.
  3. 3. On low speed add in flour one cup at a time, and baking soda. Mix until incorporated. Dough should come together, and be a little bit sticky but easily able to shape. Add more flour a tablespoon at a time if too thin.
  4. 4. Shape spoonfuls of dough into balls in the palm of your hand. Place cookies 1 inches apart on un-greased cookie sheet. *To make them extra fancy, roll the balls in sugar before placing them on the cookie sheet*
  5. 5. Bake in preheated oven for 10 to12 minutes. Remove from oven, and immediately press a jumbo chocolate chip or chocolate kiss into each cookie. Allow to cool completely, so the chocolate hardens before storing.
b a k e a h o l i c https://www.bakeaholic.ca/


Bread, Christmas, Dairy-Free

Pumpkin Cinnamon Rolls

December 14, 2013

Pumpkin Cinnamon Rolls // bakeaholic.caPumpkin Cinnamon Rolls // bakeaholic.caIt was December 1st a day ago, and now it’s almost a week until Christmas. Crazy how time goes by so quickly. I actually bought and ordered our christmas cards at the end of November and thought I was on top of things. However, somehow they were only sent out this week. I probably should have sent them out at the beginning of December like I thought I was going to do. Oops.

I am on top of my christmas shopping though. Last night I think I actually managed to finish all of my shopping. There’s a few things I bought online this year and I am hoping they make it in time for the big day. One of them is actually at the post office right now waiting to be picked up, but when I went the other day there was a line up out the door to pick up packages. I think I’ll try again today and hopefully it won’t be so crazy. Maybe.

Now it’s time to wrap all of the gifts. Our family had lots of traditions growing up, including opening all of our gifts on Christmas Eve because that’s the European tradition.

Italians have a big Christmas Eve, and Christmas day isn’t traditional as it is in Canada. I never woke up on Christmas morning to a stocking, or the excitement that Santa had come. I had all my gifts Christmas eve, usually falling asleep on the couch waiting for ‘Santa’ to visit my Nonna’s house (usually my Nonno or my Zio dressed as Santa) after our massive Feast of Seven Fishes dinner. Which was fine by me because that meant I got to wake up on Christmas morning and immediately play with my toys. Some years my brother Nick or I would stay at my Nonna’s and sleepover there instead on Christmas eve, waking up with my Nonna and Nonno on Christmas morning. 

Christmas day we spent with my moms side of the family, with a big dinner surrounded by aunts uncles and all of our cousins (my mom is the youngest girl of 6 children, so we have a lot of cousins). However, since we never did the whole Christmas morning thing, we never had a big Christmas day breakfast or brunch like a lot of families do. Usually it would be coffee for my parents and Panettone for Nick and I. 

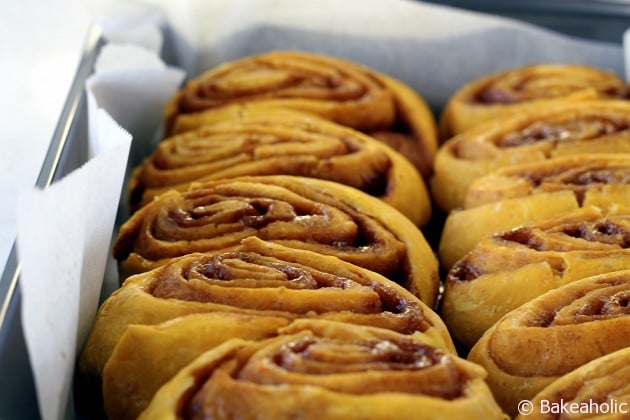
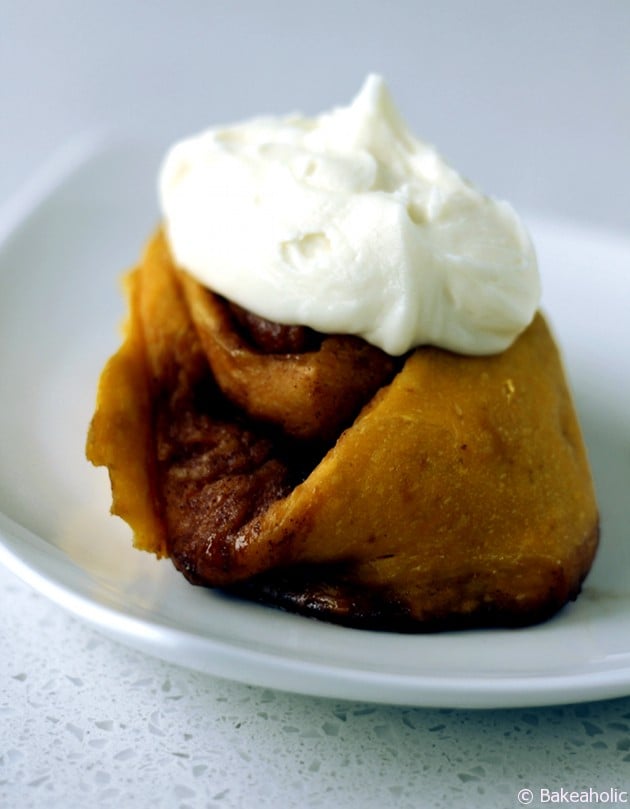
These Pumpkin Cinnamon Rolls would be a great addition to Christmas morning when you’re feeding a crowd, and you could even make them the night before just allow them to rise and then leave them in the fridge until morning. Take them out about 30 minutes prior to baking. I used coconut sugar instead of brown sugar, so they aren’t overly sweet since they are usually smothered in a sweet cream cheese icing. I found the original recipe here, and subbed in Almond Milk for regular milk, reduced some of the sugar and made it with half gluten/wheat free flour as well. 

Pumpkin Cinnamon Rolls // bakeaholic.ca

Pumpkin Cinnamon Rolls // bakeaholic.ca

Pumpkin Cinnamon Rolls
Write a review
Print
Prep Time
2 hr
Cook Time
25 min
Total Time
2 hr 25 min
Prep Time
2 hr
Cook Time
25 min
Total Time
2 hr 25 min
For rolls
  1. ¾ cup almond milk, warmed to 100 degrees
  2. 2 ¼ tsp active dry yeast
  3. 1/4 cup granulated sugar
  4. ¼ cup butter, melted and cooled
  5. 3 eggs, room temperature
  6. 1 cup pumpkin puree
  7. 3 cups all purpose flour
  8. 3 cups gluten free/wheat free all purpose flour
For filling
  1. 1/2 cup butter, softened
  2. 1 ¼ cup coconut sugar
  3. 11/2 tbsp ground cinnamon
  4. 2 tsp ground ginger
  5. 1 tsp ground nutmeg
For icing
  1. 1/2 cup cream cheese, room temperature
  2. ¼ cup butter, softened
  3. 1 cup confectioners’ sugar
Instructions
  1. In the bowl of a stand mixer, combine warm almond milk and 1 tsp granulated sugar. Sprinkle with yeast and let stand 10 minutes, until frothy.
  2. Next whisk melted butter, remaining 1/4 cup sugar, eggs and pumpkin puree together in a medium bowl.
  3. Use paddle attachment to beat 3 cups of the flour into the frothy yeast, then add in the pumpkin mixture.
  4. Switch to dough hook attachment. On the lowest mixer speed, add remaining 3 cups of flour one cup at a time until the dough forms a smooth ball, about 5 minutes.
  5. Transfer dough to an oiled bowl ( I like to spray mine with coconut oil), turning dough to coat completely with oil.
  6. Cover with plastic wrap and let rise in a warm place until doubled in volume, about 1 ½ hours.
  7. Turn dough onto a floured surface and roll it out into a rectangle about ⅛” thick.
  8. For filling, spread softened butter over the surface of the dough using your hands to cover evenly.
  9. Combine brown sugar and spices in a small bowl, and sprinkle over the butter.
  10. Starting with the edge closest to you, gently roll the dough into a long log.
  11. Using a dough scraper, or sharp knife cut into about 15-17 pieces.
  12. Arrange in a 9×13” baking dish, and one other small baking dish. Cover with a clean towel and allow it to rise somewhere warm until doubled in volume once more, another 60 minutes.
  13. Once ready, bake at 350 F for 20-25 minutes.
For icing
  1. In a medium sized bowl using a hand mixer, combine cream cheese and butter. Continue to mix until fluffy and whipped. Add confectioners’ sugar. Beat until well combined. You can spread onto warm rolls, if you want it to melt a little. Otherwise allow the buns to cool and then spread on for a thicker icing.
Adapted from Foodess
b a k e a h o l i c https://www.bakeaholic.ca/