Dairy-Free, Muffins, Wheat Free

Pumpkin Oat Muffins

October 9, 2013

pumpkin muffinsas

pumpkin muffi1ns

pumpkin muffins bakehaolic

It is crazy to believe that this weekend is already Canadian thanksgiving. 

It seems like just yesterday I was beginning a new school year, and a new job and now I’m already a month and a half in to teaching. 

I’ve welcomed the fall weather with a big cosy cable-knit sweater hug and pumpkin spice candles. Although this week it was more like summer with highs of 20+ outside. On these days I have no idea what to wear because right now my closet is in a huge transition between seasons. I’m struggling to put away the summer clothes and coax the sweaters and and jackets out of their hiding spot, tucked away in a large container under our bed. 

I love finding sweaters and dresses from last year that I had forgotten about, it’s like shopping in your own closet (which I know Adam will be happy about 😉 .) Though he did call that I would say “I need to buy some new boots,” and in my defence I do wear my shoes hard. Adam says it’s because I am such a fast/fervent walker. I’ll admit I can out-walk anyone, and I pound the pavement. 

Every pair of TOMS or BOBS that I own have a large hole in the big toe where I drive my foot into. And every pair of boots has a tongue-flapping sole that is barely hanging on. This is not ideal when it begins to rain pour here in Vancouver. The tongue begins to lap up the water, drawing it into my boot. My sock does not stay nice and dry, and wet feet are one of the most uncomfortable things ever. I also have incredibly cold feet, all the time, which cold weather doesn’t help. 

Finding the right boot is a big deal for me. I like a plain boot, with not a lot of bells and whistles, i.e. none of the giant buckles or clasps, and definitely no studs. However, it seems the fashion that most boots have these things. So, I begin my search for the perfect tall, skinny, plain black boot. My mom bought me a pair from Old Navy last year that I am currently wearing, holy sole and all until I find a new pair. 

Have you found your new Fall boots yet?? Any good deals or favourites?

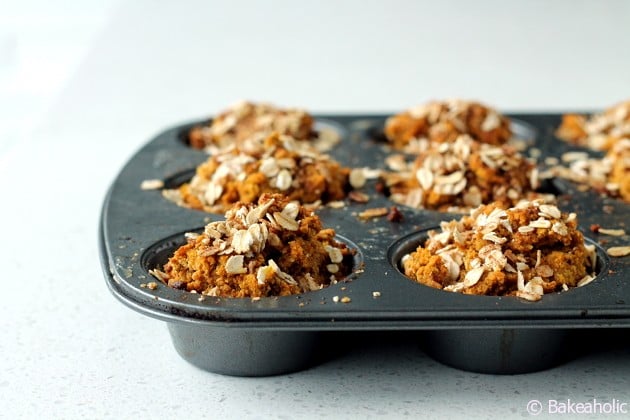
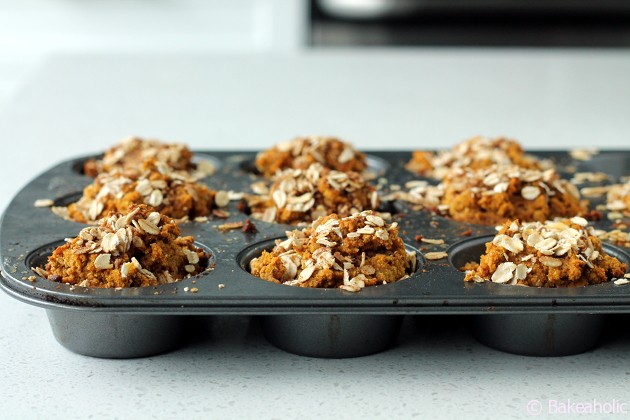
Another seasonal favourite is Pumpkin. If you follow me on Pinterest, you’ll see I have a Pumpkin Everything board. And yes, everything in our house right now is being made with a little pumpkin. I even threw a heaping tablespoon into my turkey chili on Saturday. 

These muffins are wheat free, and dairy free, but incredibly moist. I tossed most of them into the freezer so I could pop one in the microwave for a quick pumpkin snack. I warmed one up yesterday when I got home from work and smeared some almond butter on it. Amazing. 

For Thanksgiving this weekend I’m making 2 pumpkin pies, an apple pie and possibly other confections. We have two dinners, one with Adam’s family and one with mine. Adam gets home from Wisconsin Thursday night, and my Mom gets home from Europe on Saturday afternoon. I’m also hoping we can make it to a pumpkin patch this weekend!

What are you making for Thanksgiving?? 

pumpkin cupcakes bakea

Pumpkin Oat Muffins
Yields 12
Write a review
Print
Ingredients
  1. ¼ cup coconut oil
  2. 1/4 cup coconut sugar
  3. ¼ cups Brown Sugar
  4. â…” cups Canned Pumpkin
  5. ½ cup coconut milk
  6. 2 whole Eggs
  7. 1 Tablespoon Molasses
  8. 1 1/2 cups Quinoa Flour
  9. 1/2 cup coconut Flour
  10. 1 teaspoon Baking Soda
  11. ½ teaspoons Baking Powder
  12. 2-3 teaspoons Pumpkin Spice
  13. +for the topping+
  14. 3 Tablespoons Rolled Oats
  15. Cinnamon
  16. 2 tsp. Coconut Oil
Instructions
  1. Preheat oven to 375 degrees.
  2. Cream together coconut oil and sugars until creamy.
  3. Beat in pumpkin, coconut milk, eggs, and molasses.
  4. Combine the dry ingredients in a small bowl and mix into the batter. Stir just until combined.
  5. Fill greased or paper-lined muffin tins 2/3 full of batter.
  6. Combine the oats, cinnamon and coconut oil together for the oat topping. Sprinkle over tops of muffins.
  7. Bake for 20 to 25 minutes or until a tester inserted in the center comes out dry. Cool in the pan for 5 minutes. Muffins will be very moist - store on counter for 2-3 days, or you can also freeze them for a quick snack.
b a k e a h o l i c https://www.bakeaholic.ca/


Cookies

Book Review: Butter Baked Goods

October 7, 2013

Butter Baked Goods

When you think of a bakery, is there really any better name than Butter? After all, butter is the essence of most flakey, crisp, moist and  chewy baked goods. Simply, butter makes everything better. 

image

I was very excited when I was asked if I would like to receive a copy of a new cookbook created by  local Vancouver baker Rosie Daykin. Butter Baked Goods and their famous Butter Marshmallows are  common knowledge around here. The bakery opened in 2007, and their famous marshmallows are now in over 300 stores in Canada, The United States and Japan. 

The bakery has now expanded and moved to a larger location to become Butter Baked Goods & Cafe where you can find all sorts of delicious confections including cakes, pies, bars, cookies, muffins and cupcakes. The bakery itself is like stepping back in time to the 50s with its retro feel, blanketed in soft pink and green pastels. The smell of nostalgic baked goods make you feel at home. 

With Butter’s new cookbook you can bring home that nostalgic feeling and share their famous baked goods with friends and family. The book is filled with recipes for homemade treats and childhood favourites. 

The book itself is gorgeous, hardcover draped in pink and green pastels just like the bakery and filled with delicious recipes and a Butter ribbon to mark your place or favourite recipe. 

The book begins with introductory chapters where you will find information on ingredients, tools and proper techniques to ensure successful baking.

The cookbook offers over 100 recipes in 9 categories:

  • Muffins, Scones, Cinny Buns and Loaves
  • Drop and Sandwich Cookies
  • Rolled and cut Cookies
  • Bars and Slices
  • Butter Creams and Frostings
  • Cakes
  • Cupcakes and Whoopie Pies
  • Pastry, Pies and Tarts
  • Confections

Each chapter has mouthwatering pictures of the bakery’s most-loved recipes that will surely become household favourites. The recipes are clear, with each ingredient listed, directions and a list of tools needed as well as step-by-step photos for butter creams and frostings. 

I quickly decided which one to try first – a recipe that seemed perfect for cooler fall days, the Gingerstamp. I love the earthy warm spice of ginger, especially in baked goods. Rosie boasts “there is no snap to be found in this ginger cookie,” rather they are her daughters “Soft and Chewy” favourite. 

These would be a great holiday cookie for Thanksgiving or Christmas – and perfect for a cookie swap. 

ginger stamp cookies butter baked goods

The cookies are just as you would imagine to find on a bakery counter. They are big, warm, soft and chewy bakery-style cookies that you can now make in the comfort of your own home. The recipe makes 24, though I think I made more than that. I suggest baking half of them, then freezing the leftover rolled dough balls to have on hand the next time a cookie craving hits. 

The cookbook debuts October 15th. 

giner

ging

gingers

ginger

gingerstamp

The Gingerstamp
Yields 24
Soft and chewy, there is no snap to be found in this ginger cookie.
Write a review
Print
Ingredients
  1. 4 cups all-purpose flour
  2. 2 tsp baking soda
  3. 2 tsp ground ginger
  4. 1 tsp cinnamon
  5. 1/2 tsp ground cloves
  6. 1/2 tsp salt
  7. 3/4 cup unsalted butter, room temperature
  8. 2-1/2 cups granulated sugar, divided
  9. 3 large eggs
  10. 1/2 cup fancy molasses
  11. 1 tsp pure vanilla extract
Instructions
  1. 1 Preheat the oven to 350F.
  2. 2 On a large piece of parchment paper, sift together the flour, baking soda, ginger, cinnamon, cloves and salt; set aside.
  3. 3 In a stand mixer fitted with a paddle attachment, cream the butter and 2 cups of the sugar on medium to high speed until light and fluffy.
  4. 4 Scrape down the sides of the bowl. Add the eggs, one at a time, and beat briefly after each addition.
  5. 5 Scrape down the sides of the bowl. Add the molasses and vanilla. Continue to mix on high until the molasses and vanilla are well combined and the mixture is pale in colour. Scrape down the sides again.
  6. 6 Turn the mixer to low speed, add the dry ingredients and mix until fully combined.
  7. 7 In a small bowl, add the remaining 1/2 cup of sugar. Use a small-medium sized ice cream scoop to drop 24 equally sized portions of dough, one at a time, into the sugar.
  8. 8 Use your fingers to roll the dough around to coat on all sides, then place the cookies on parchment paper-lined cookie sheets, about 1-1/2" apart.
  9. 9 Use the palm of your hand to press down lightly on top of each portion to flatten slightly.
  10. 10 Bake for 15 to 17 minutes, or until the cookies are firm around the edges but still slightly soft in the centre.
  11. 11 Remove from the oven and transfer the cookies to wire racks to cool.
  12. Makes 24 cookies.
b a k e a h o l i c https://www.bakeaholic.ca/


Apples

Baked Apples

October 2, 2013

Baked Apples // bakeaholic.ca

Baked Apples // bakeaholic.ca

 Apples have never been my favourite fruit to bake with. I prefer a cold, hard, crunchy apple that I can bite into. Or, a sliced apple paired with some sort of nut butter. Perfection. 

Adam however demands an apple pie for almost every holiday, even his birthday. Yesterday he was my super hero for picking up, fixing and returning my broken down car while I was at work. So I figured I owed him one. 

And yes – baking an apple pie does make us even for him fixing my car in boyfriend/girlfriend world. Right? Well, I’m sure I’ll be owing him many more apple pies. But for now, he has this. 

He was home before me yesterday, since he had to deal with my car he worked from home in the afternoon. And when I got home he requested an apple pie OR if that was too much effort (ha) something of equal deliciousness with apple and pastry. 

I settled for the later, since an apple pie requires the dough to be made and chilled in advance. I searched online for about 5 minutes to find an equally pleasing recipe since I really didn’t have any apple recipes on hand. I found two, and decided to make both since we had a large bag of apple leftover from the Roasted Butternut Squash Carrot Apple Soup I had just made. 

I really don’t know why it took me so long to make baked apples. They’re simple, they’re delicious, and if you make them my way they really aren’t all that bad for you. To be honest, you could make this for breakfast. 

The thought of a baked apple just wasn’t appealing to me – I don’t like mealy, mushy, soft apples, that is, until I made them. Even without the butter and heaps of sugar it still caramelized and tasted like apple heaven. 

This is definitely a Fall dessert. It’s warm and comforting for the cold dark rainy days, healthy, and apples are in season. And a perfect thanks-for-everything-you-do dessert. 

I used both granny smith apples and BC Gala apples – both were delicious. I made the filling with whatever I had on hand which happened to be oats, coconut, raisins and almonds. You can really use any kind of nut like pecan or walnut too, and even use dried cranberries. 

Be sure to serve them warm from the oven, and if you want a real treat maybe serve it with some banana ice cream.

Baked Apples // bakeaholic.ca

Baked Apples // bakeaholic.ca

Baked Apples // bakeaholic.ca

Baked Apples
Serves 4
Write a review
Print
Prep Time
5 min
Cook Time
1 hr 15 min
Prep Time
5 min
Cook Time
1 hr 15 min
Ingredients
  1. Handful of nuts, chopped (Almond, Walnut or Pecan)
  2. 1 teaspoon coconut sugar
  3. 1/4 cup raisins
  4. 2 Tbs. unsweetened coconut
  5. Dash of cinnamon
  6. Dash of nutmeg
  7. 1/2 cup rolled oats (not quick oats)
  8. 2 Tbs. oil (canola or coconut)
  9. 5 medium tart apples such as Granny Smith, Gala, Pink Lady, Jazz
  10. 1 cup apple juice or apple cider
Instructions
  1. Preheat oven to 350°
  2. In a medium bowl, combine nuts, sugar, cinnamon, nutmeg, coconut, raisins and oats. Add oil and toss to combine.
  3. Peel the top third of each apple and, using a melon baller, scoop out the stem and enough of the core so that the walls of the apple are about 1/2 inch thick. Take care not to break through the bottom of the apple. Make the hole a bit wider at the top.
  4. Stuff each apple generously using a small spoon or your fingers; mound extra filling on top.
  5. Put the filled apples in a glass/ceramic baking dish. Pour apple juice/cider into the pan around the apples, cover the dish with foil, and bake for 45 minutes.
  6. Remove foil and bake, basting using a spoon every 15 minutes, for an additional 30 minutes, or until apples are easily pierced with a sharp knife (they may split open a bit at the bottom).
  7. Serve apples drizzled with the sauce from the pan.
Notes
  1. Store any leftover apples in the fridge, heat for one minute.
b a k e a h o l i c https://www.bakeaholic.ca/